We’ve been dreaming about life on the road for years — buying a van, turning it into a tiny home, and traveling the world full-time. But for now, our budget doesn’t quite stretch that far. So we found the perfect alternative to wait it out: convert our car to a camper and hit the road anyway!
If you’re craving freedom and adventure like we were — but don’t have the money to buy or rent a camper van — don’t worry. You can turn your car into a camper too!
In this article, we’ll show you how easy it can be to create a simple car camper conversion, no matter what vehicle you have. With a few tools, some creativity, and a little time, you can build your own road trip car setup.
We’ll walk you through how we transformed our tiny Opel Agila step by step — from bare-bones car to road-ready camper.
Prefer watching instead of reading? Check out our video here:
💰 Total cost of our car camper conversion: around $325
🛠️ Time spent building: about 60 hours over 3 weeks
We worked 4 to 5 days a week, about 4 hours each day — nothing crazy!
Step 1: Planning and Taking Initial Measurements
Before you convert your car to a camper, it all starts with ideas and inspiration. For us, the first step was mostly about research. We spent hours watching car camper conversion videos on YouTube — and one of them really sparked our creativity.
That gave us a rough idea of the road trip car setup we wanted. So we sketched out a very basic layout.
Then came the first measurements: trunk height, total car length, width between the doors, width at the trunk… all of it.
We wrote everything down and used those numbers to guide our plan.
Tools used: Internet, smartphone, paper, pen, measuring tape, and a level.
Step 2: Mocking Up the Layout with Cardboard
Before jumping into the real build, we needed to test our layout. So we decided to recreate our future setup — using all the measurements we had taken — with cardboard.
We grabbed some old boxes, marked out our dimensions, and started cutting.
This step is essential. It helps confirm that your plan makes sense in real life and that your car camper conversion will actually be practical once you’re on the road.
⇩ Here’s a sneak peek at what our future setup looked like in cardboard ⇩


Materials used: Old cardboard boxes
Tools used: Measuring tape, level, pencil
🚗 Want to see how our road trip car setup worked out on the road? Check out this article where we share the full itinerary from our very first one-month road trip in our DIY car camper!
Step 3: Buying Materials and Getting the Wood Cut
Time to hit the hardware store (we went to Leroy Merlin, but any DIY store will do) to grab the supplies we needed.
We didn’t buy any tools — we borrowed everything from Gabriel’s dad. Pro tip: talk about your car camper conversion project with friends and family. You might be surprised who’s willing to lend a hand (or a drill).
For the build, we picked four poplar plywood boards, 15mm thick and 120x60cm in size.
Spoiler alert: we later learned that this wood wasn’t exactly the ideal choice for our setup.
Spoiler alert #2: after sleeping on it several times — it worked just fine! Strong and sturdy.
If you’re unsure about which wood to choose, don’t hesitate to ask for advice at the store or check with someone who knows a bit about carpentry.
For the storage frame, we used okoumé plywood. We had all the wood pre-cut to our measurements in-store — no need to handle that part ourselves.
👉 If you’ve never worked with wood before, we highly recommend getting your boards cut directly at the store. Most places (like Leroy Merlin) offer this service for free. You pay per square meter, and it saves you from ending up with awkward leftover pieces.

As you’ve probably guessed by now — this is when the spending starts. 🛠️
If you’re trying to keep your convert car to camper project budget-friendly, take your time. Think before you buy, compare prices, and most importantly: ask for advice from people who know a thing or two about DIY.
📚 You might also like: How to Choose the Right Van for Your Camper Conversion
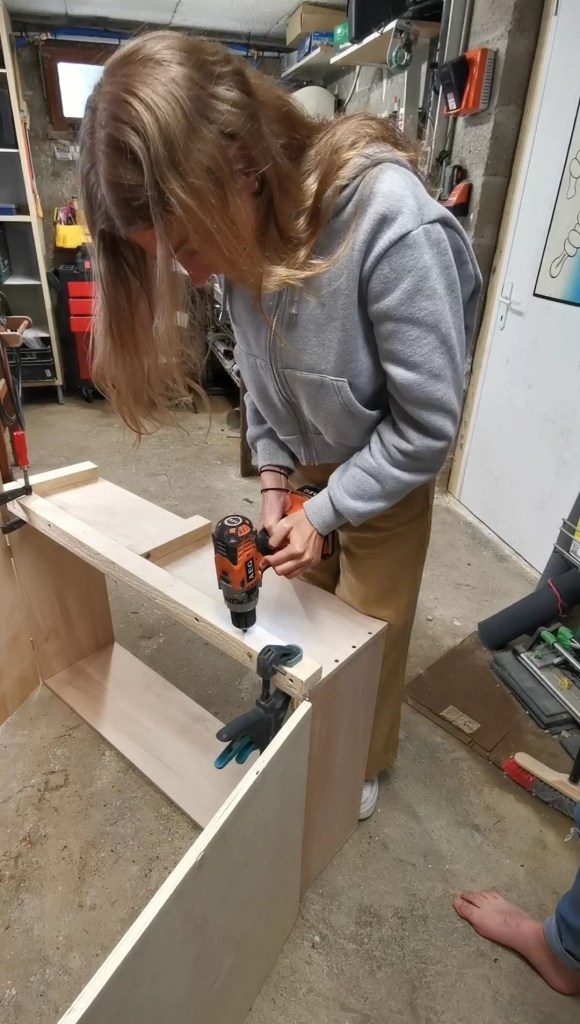
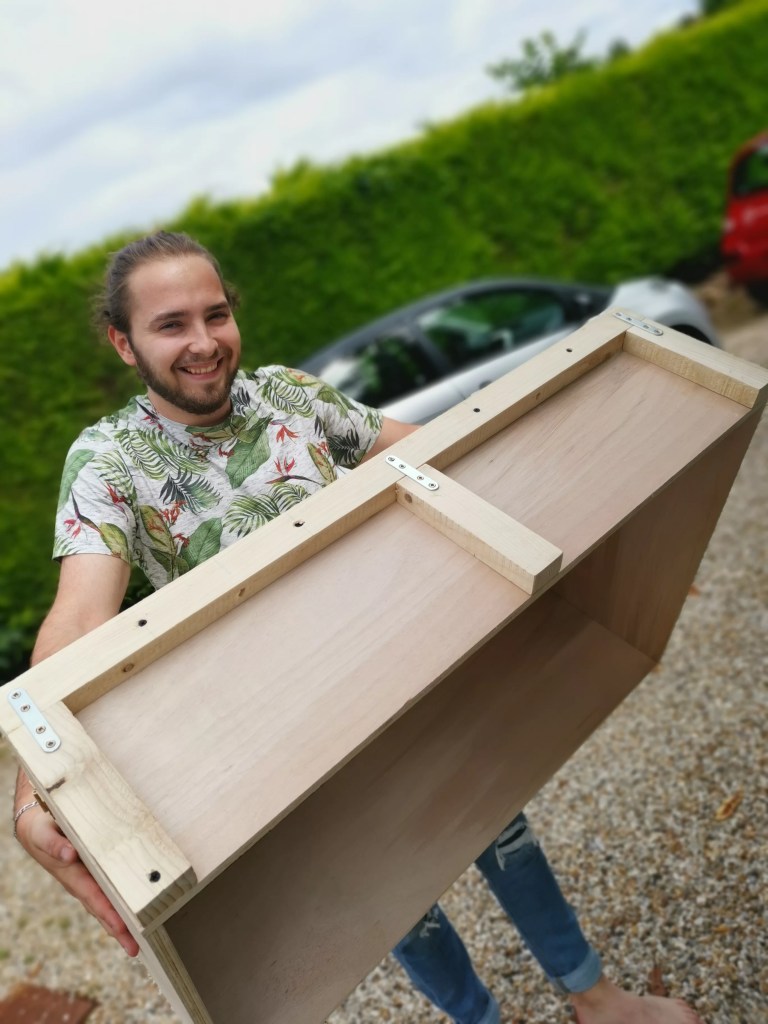
Step 4: Building the Storage Box
As we mentioned earlier, we had our wood cut to size directly at the store. So once we got home, all we had to do was put everything together.
A few screws, a screwdriver (or a drill), and the four panels were assembled into a sturdy frame!
To finish the box, we added two extra boards on top — these would act as lids or doors. We measured the frame, cut two panels to fit, and attached them using simple metal hinges and a few more screws. Easy peasy.
We were pretty happy with the result already, but something was missing… a handle!
So we grabbed a jigsaw, made a quick cut, and voilà — built-in handle done.
As you’ll see in the photos below, our build isn’t perfect — but it works for us! The storage box is big enough to hold all our camping gear (shower, pop-up shower tent, stove, water container… you name it).
⇩ Check out some photos of the box assembly below ⇩


Materials used: Wood panels, metal hinges, screws, wood glue
Tools used: Screwdriver or drill, jigsaw, square, level, measuring tape, pencil…
Step 5: Assembling the Second Part of the Setup
Since our cardboard mock-up worked pretty well, we simply followed that design. Just as a reminder: our car camper setup is divided into three parts —
1️⃣ the permanent storage box,
2️⃣ a middle section that attaches to it,
3️⃣ and a final section that reaches toward the front seats (both removable).
For this second section, we cut our wood panels to size, based on the measurements we had used for the cardboard version. We used a circular saw and a sander to get a clean finish — and voilà, we had our left and right panels ready to go!
Then came the tricky part: figuring out how to connect this removable second section to the permanent box in a secure and stable way.
💡 Our solution: we built a U-shaped wooden frame using timber battens and attached it directly to the box. This gave us a new solid anchor point for the setup.
We drilled two holes in this frame — one on each side — and then drilled matching holes in the wood panels. Once we aligned them and everything fit properly, we just needed to find some large screws to lock it all together.
✅ Now, every time we want to attach the second section, we just drop it onto the frame and screw it in place. It doesn’t budge!
But we weren’t done yet — we needed one more element: a “leg” to support the front of this section and give it extra stability. We made it from timber battens and attached it with a couple of hinges. In just a few minutes, the second part of our car camper conversion was much more solid!


Materials used: Wood panels, timber battens, screws, wood glue, hinges…
Tools used: Circular saw, jigsaw, screwdriver, drill, square, level, pencil, measuring tape…
📚 You might also like: The Complete Guide to Planning Your First Road Trip
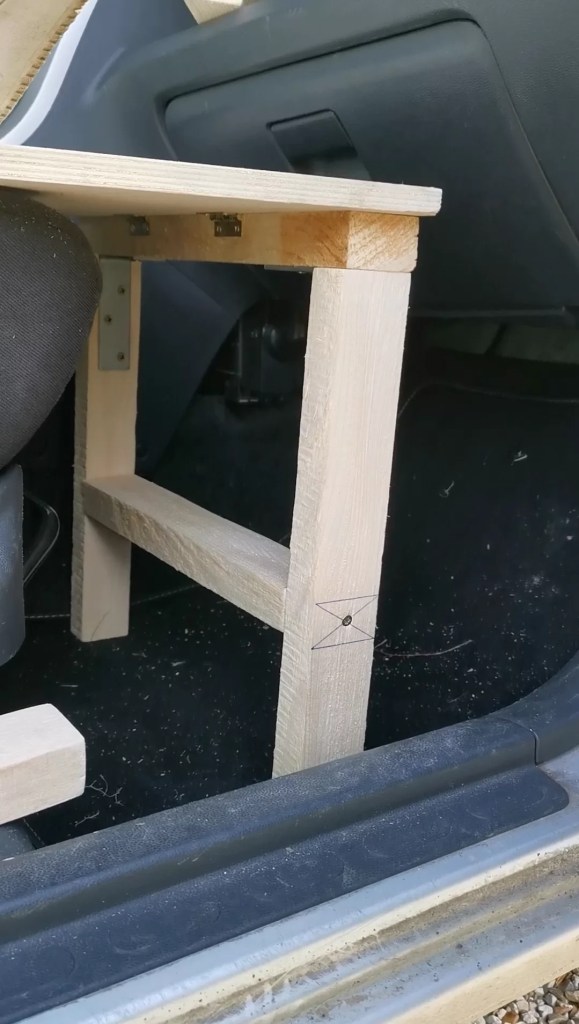
Step 6: Third and Final Part of the Wooden Setup
To build the third and final part of our setup, we simply cut the remaining wood panels to complete our 2-meter sleeping platform. This last section is about 80 cm long (roughly 31 inches).
Next, we had to figure out how to connect it to the second section. We went with one long hinge — which allows us to fold the platform when it’s not in use. Super practical for everyday use.
There were still a few important details left — like reinforcing the structure.
We decided to use two aluminum bars for added strength. Each time we set up the bed, we slide these bars underneath the platform. To keep them in place, we built custom guides using timber battens and flat metal strips.
📸 (Don’t worry — the photos will make all of this easier to visualize!)


The final touch? Adding a “leg” to support the end of this third section and make the whole setup rock solid.
Nothing complicated here — we just measured the height we needed, cut a few timber battens, and built a simple support. Then we attached it to the platform using a hinge, so the leg can fold away neatly when not in use.
Easy to build, easy to store, and super effective!
Materials used: Wood panels, screws, hinges, aluminum bars, timber battens, wood glue…
Tools used: Circular saw, jigsaw, square, level, pencil, measuring tape…
Step 7: Adding Carpet for a Clean Finish
This step isn’t mandatory — but it really made a difference for us.
We decided to cover the entire setup with thin carpet. It gave the build a more polished, cozy look, and also helped protect us from splinters or chipped plywood edges.
Luckily, we had a large roll of carpet tucked away in the garage. After giving it a good clean and brush, we measured and cut it to match the different parts of our camper setup.
For the installation, it couldn’t have been easier — we used carpet double-sided tape. Within minutes, our DIY car camper conversion looked way more finished and comfortable!
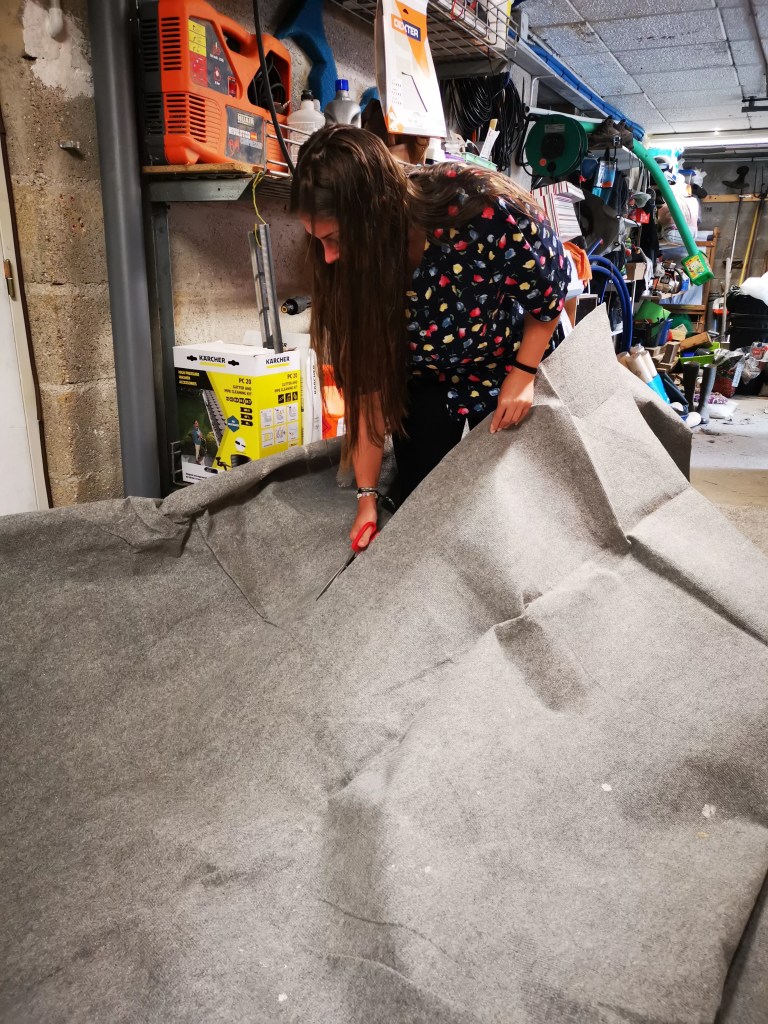


Materials used: Carpet, carpet cleaning spray, double-sided carpet tape…
Tools used: Scissors, utility knife, ruler, measuring tape, pencil…
📚 You might also enjoy: Do You Really Need a Van to Be a Vanlifer?
Step 8: Making DIY Curtains
For us, curtains were a must! We just couldn’t imagine sleeping in our car without a bit of privacy. We didn’t want to be visible from the outside — no thanks!
We started by measuring all the windows. To do that, we used tracing paper: we pressed it against each window, drew the outline, and then cut out the paper templates.
Next, we laid those templates on the fabric and cut out the shapes.
We reused some thick blackout curtains we already had lying around — perfect for blocking light and prying eyes.
To install them, we stuck velcro strips around each window frame, then attached the matching side of the velcro to the curtains.
If we wanted a cleaner finish, we could have hemmed the edges to prevent fraying… but honestly, we didn’t feel like it — and it works just fine!
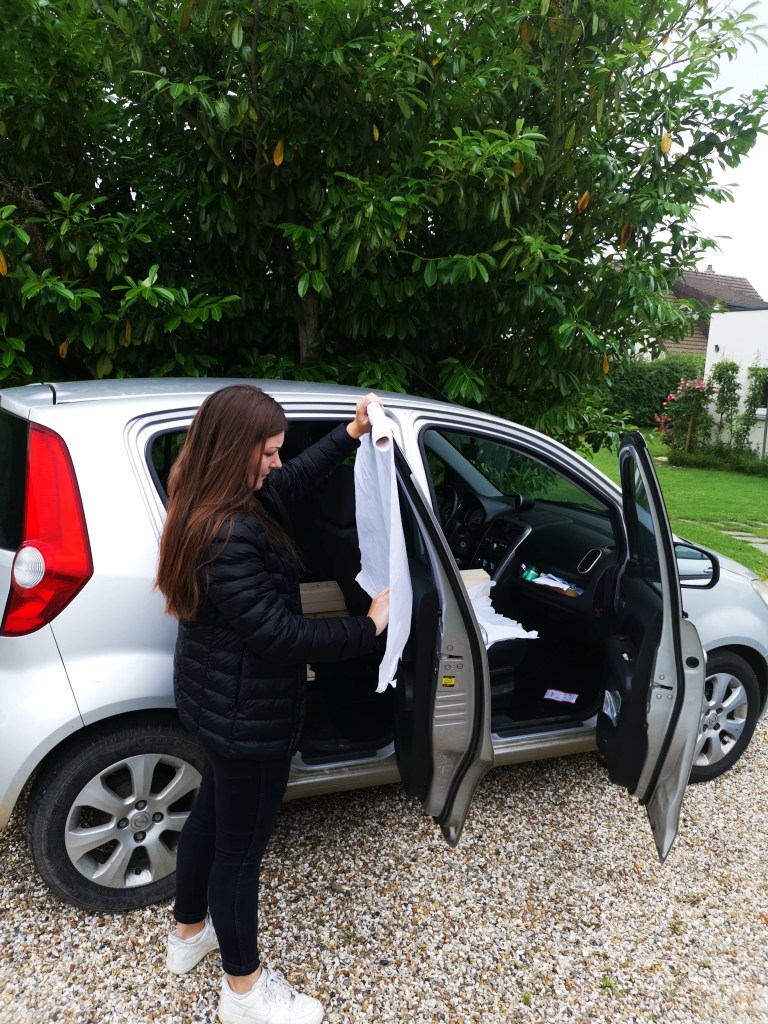


Materials used: Pattern paper or cardboard, velcro strips, blackout fabric…
Tools used: Pencil, measuring tape, scissors, utility knife…
Step 9: Choosing the Right Mattress
When it came to picking a mattress, we had a few options: inflatable mattress, yoga mat, self-inflating camping pad, foam mattress… we really took our time to think it through.
At first, we wanted to go with a foam mattress. But finding one with the exact right dimensions turned out to be really tricky — and honestly, way over our budget.
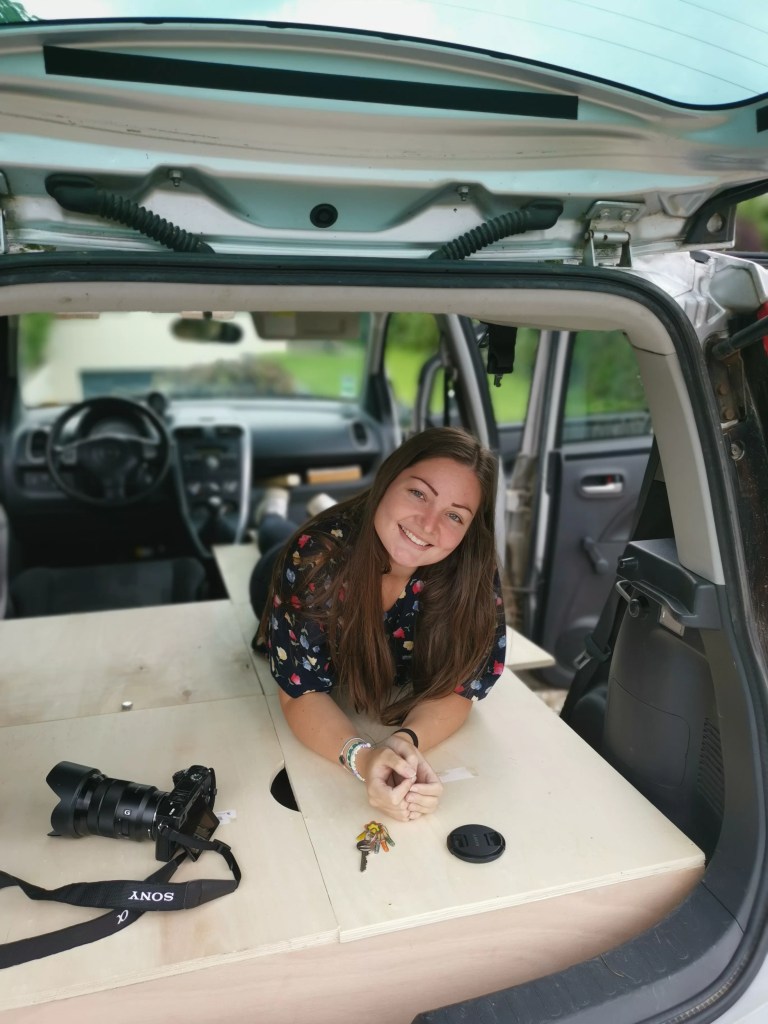
So we chose a double inflatable mattress (120x190cm) from Decathlon. Easy to deflate, compact to store — perfect for a small road trip car setup.
💬 Update after one month on the road: Sleeping on an inflatable mattress long-term? Not ideal. We often woke up with back pain. The mattress tended to deflate a bit during the night due to temperature and air density changes.

Step 10: Testing the Setup
Before hitting the road in our converted Opel Agila, we decided to do a trial run… in our backyard. First night verdict: comfy enough and totally works!
💬 Update after one month of road tripping across France:
We’re pretty proud of our build! It held up well, kept us comfortable, and allowed us to fully enjoy the freedom of vanlife — discovering beautiful wild camping spots all over France.
Each evening, we set up the sleeping platform.
⏱️ Setup time: 3 minutes (not counting the inflatable mattress).
⏱️ 13 minutes total if you include inflating the mattress.
Every morning, we packed it all away in 3 minutes flat — and just like that, our tiny camper turned back into a regular car.


Must-Have Items for a Car Road Trip
To really enjoy your road trip car setup, being well prepared makes all the difference.
Of course, there are the classics — like a first aid kit or an old-school paper road map (trust us, it can be a real lifesaver when there’s no signal). But here are some of the lesser-known items that truly leveled up our trip:
- Headlamps – For hands-free lighting at night. Incredibly useful.
- Mesh storage net – A total game-changer for staying organized. Keeps gear secure and easy to access. We picked one up mid-trip and never looked back.
- Jute potato sack for dirty laundry – Keeps things contained and prevents clothes from spreading out all over the car.
- Pressurized solar shower – We started with a gravity-based one. Not practical. The pressurized version is 10x better.
- Microfiber travel towels – Super compact and quick-drying — ideal for vanlife or any type of camping.
- 10L water jerrycan – We had one hard plastic and one soft. The hard one took up more space but didn’t leak. The soft one?… flooded our car during a storm. 😬
- Camping stove (like a Campingaz) – Essential for hot meals on the go.
- Victorinox Swiss Army knife – Always handy.
- Natural dish soap (we used black soap) – Eco-friendly and perfect for washing dishes in the wild. We still use it in our van!
- Sleeping bags – Great for colder nights.
- 30,000 mAh power bank – Massive help! We recharged it at cafés or using a 12V–230V car inverter. If your phone has a 5,000 mAh battery, this can recharge it up to 6 times!
- Bluetooth speaker – For music, podcasts, or campfire vibes.
- 12V to 230V car inverter – As digital nomads, we needed this to charge laptops. It also charges phones faster than the car’s USB ports.
- String lights – Adds a cozy touch to your mobile home.
- Hammock – For chill moments wherever you stop.
- Audible’s 30-day free trial – We binged horror stories in the middle of the woods 👻 Totally worth it!
Turn Your Car into a Camper: 3D Layout and Design Plans

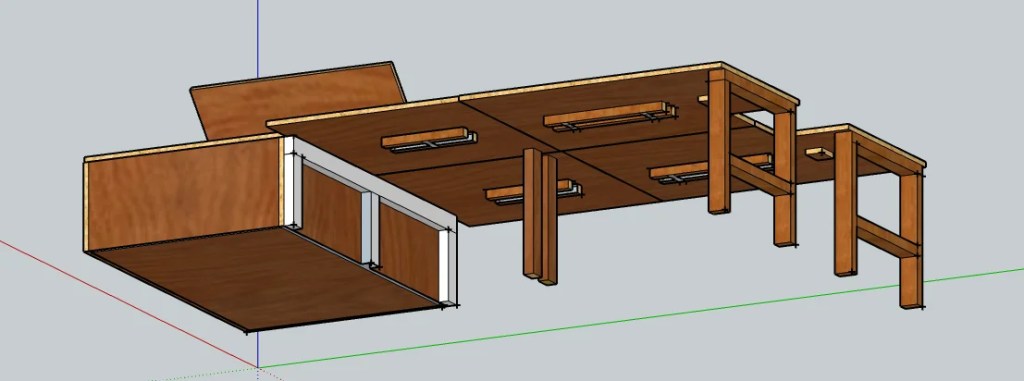
To give you a better idea of how we managed to turn our car into a camper for this road trip, we created a 3D model of our setup using SketchUp.
⚠️ Please note: the dimensions are based on a 2009 Opel Agila Enjoy.
The Storage Box

For the storage box in our setup, we used the following:
Lid panels:
– 2 boards measuring 61 cm x 48.5 cm x 1.5 cm
Box structure:
– 2 boards of 97 cm x 25 cm x 1.5 cm
– 2 boards of 58 cm x 25 cm x 1.5 cm
Support frame:
– 1 batten of 97 cm x 5 cm x 3 cm
– 3 battens of 20 cm x 5 cm x 3 cm
The Middle Section


For the central part of our setup, we used the following:
Platform:
– 2 boards measuring 60 cm x 59 cm x 1.5 cm
Support legs:
– 2 battens of 35.1 cm x 5 cm x 3 cm
Rails to hold the metal support bar (for added stability):
– 4 battens of 25 cm x 2.5 cm x 2.5 cm
⚠️ It’s important to note that the rails are not centered on each platform — as you can see in the screenshot below:

The Final Section


For the last part of our setup (the section that extends toward the front of the car), we used the following:
Platform:
– 2 boards measuring 60 cm x 80 cm x 1.5 cm
Support legs:
– 4 battens of 36.5 cm x 5 cm x 3 cm
Upper frame structure:
– 2 battens of 42.1 cm x 5 cm x 3 cm
Middle support:
– 2 battens of 36.1 cm x 5 cm x 3 cm
Rails for the metal support bar (for added stability):
– 4 battens of 25 cm x 2.5 cm x 2.5 cm
Stop block:
– A small offcut of wood glued at the end of the rails to prevent the metal bar from sliding out of place.
⚠️ It’s important to note that the rails are not centered on each platform. For accurate positioning, please refer to the previous section.
⚠️ x2 We also made a cut-out in one of the boards — simply because that’s where the gear shift is located in our Opel Agila.
If you’re working with an Opel Agila like we did, you’ll find the measurements in the section above.
💡 For a cleaner finish, you can round out the cut instead of leaving it square.

Conclusion
If you’ve got a bit of free time, a car, some savings, and a strong craving for freedom — then you too can convert your car to a camper and start living the road trip dream. It’s a big step toward vanlife, and trust us, it’s totally worth it.
We hope this article (and all the photos!) gave you some inspiration and made you want to turn your car into a camper for your own adventure.
If you have any questions or need advice for your car camper conversion, feel free to reach out to us on social media — we’re on Instagram and Facebook.
Or send us an email at: contact@objectif-vie-en-van.com.
We’ll be more than happy to help!
See you on the road 🚐
Johanna & Gabriel
")


0 commentaires